Student Information
How to Import Student?
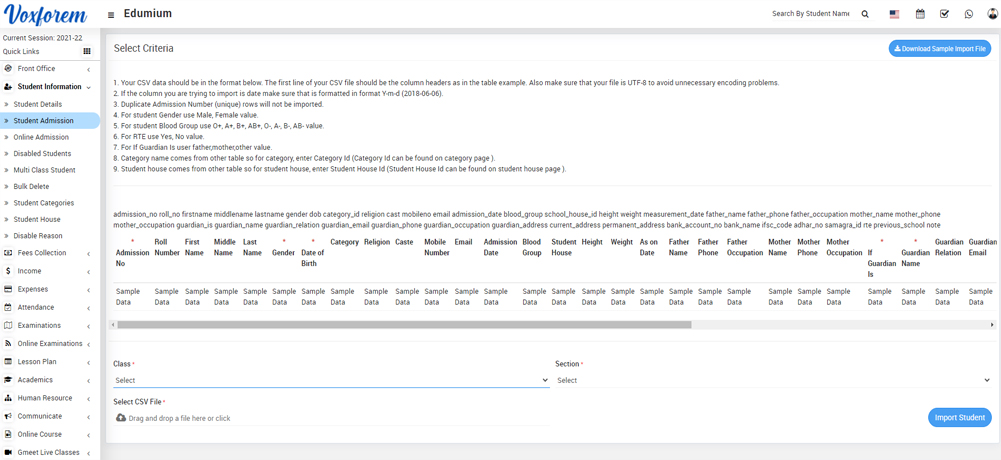
To import students, go to Student Information > Student Admission click on the Import Student button present at the top right corner on the right side in the student admission page, at the click of this button page will be open.
You have to follow all the necessary instructions given here to create a CSV file. Here you can also add multiple students at the same time for this, you have to create a CSV file format. You can also download the sample file from the top right corner by clicking on the Download Sample Import File button.
To add student Parent Guardian Detail, Fill in the details Father Name, Father Phone, Father Occupation, Father Photo, Mother Name, Mother Phone, Mother Occupation, Mother Photo and fill the Guardian Details and click on the Save button.
You shouldn’t delete the first row of the CSV file. It is necessary to fill the required field in this file. You can not use duplicate admission numbers and always fill the unique number in this file because even if you have enabled auto-generation of student admission numbers.
After completing the file, here select the Class and Section and then you have to select this CSV file on Select CSV File option and then click on Import Student button.

Note- On the student, import page instructions are given for preparing CSV files, be careful about admission number and date format Duplicate "Admission Number" (unique) rows will not be imported and you can get the message of the record already exist.
Categories
Related Articles
- About Student Information
- How to create Student Categories?
- Student admission?
- How to add Siblings?
- How to Import Student?
- How to Online Admission?
- How to view Student Details?
- How to view Disabled Student?
- How to add Multi Class Student?
- How to delete student in Bulk?
- How to add Disable Reason?
- How to check Student Report?
- How to Check Guardian Report?
- How to check Student History report?
- How to check Student Login Credential report?
- How to check Class Subject Report?
- How to check Admission Report?
- How to check Sibling report?
- How to check Student Profile Report?
- How to check Homework Evaluation Report?
- How to check Student Gender Ratio Report?
- How to Check Student Teacher Ratio Report?